Pages

7.23.2012

mamaw's banana bread

This is one of the first recipes I mastered in high school. My Mamaw's banana (nut) bread has been a staple in our family for years now. I can remember when we would drive up to Memphis from Birmingham to stay with my grandparents, & Mamaw would have a couple of loaves ready for us on the counter. & she always brought several loaves to the lake for our family reunions. It is one of the easiest things to bake, & is always so good!

ingredients:
2 cups flour
1 1/3 cups sugar
1/2 cup vegetable oil
1/2 cup buttermilk
2 eggs
1 teaspoon vanilla
1 teaspoon baking soda
1 teaspoon baking powder
3/4 teaspoons salt
3 bananas, mashed
1/2 cups pecans, chopped (or whatever you want to add)

directions:

1) Mix all ingredients except bananas & pecans with an electric mixer

2) Fold in bananas & pecans (I use mini chocolate chips instead)

3) Pour into two prepared (greased & floured) bread pans

4) Bake at 350 for 45 minutes to 1 hour, covering with aluminum foil after 35 or 40 minutes

5) Take out of oven, place sliced butter on tops & sides

6) Transfer to wire rack for cooling


Enjoy!


{alli}

7.20.2012

our garden according to my iphone

Our garden is definitely in full swing now, & we pick fresh veggies almost daily. I plan on getting out there soon with my camera to document the progress, but I have snapped several photos on my iphone over the past few weeks.

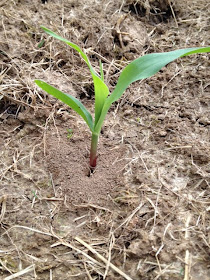
I took these two photos of our black-eyed peas & corn about a week or two after we planted the seeds.

black-eyed peas
corn

Then a few weeks later I took this of our banana pepper plant & it's first fruit.

banana pepper

This photo was taken right after we staked our tomato plants, before things started growing like crazy.

tomatoes

Pretty soon we found & picked our first cucumbers. 


Then the tomatoes began growing & we had our first green ones.


This is a photo I took from our bedroom window a couple of weeks ago. It gives you some idea of how much things have grown.


At the beginning of this week I took this photo of our first tomato, okra & eggplant pickings. We also picked some zucchini & cucumbers.

& the following photos I took yesterday as we picked a few things before the rain began.

banana peppers
black-eyed peas
corn
eggplant
Gentry & our tomatoes
huge okra
purple onion
tomato
zucchini

We have had so much fun with this garden. We plan on planting our second garden this fall with squash, zucchini, green beans, carrots, broccoli, cauliflower, & pumpkin.


{alli}

7.14.2012

picklin'

With our garden in full swing out in the backyard, we are up to our ears in cucumbers. When we got our plants back in May, I have no idea why we thought four cucumber plants would be a good idea for a garden for two. Thankfully, one of them died last week from the intense heat we've been having. We couldn't keep up with them! 

I don't really know many ways you can cook cucumbers, or how many times a day we would have had to eat them in order to keep up. Cucumbers for breakfast, lunch & dinner just didn't sound too appetizing. Here's a tip: When life gives you tons of cucumbers, make pickles.

Here's what you need:


Cucumbers, distilled white vinegar, jars, a pressure canner, seasoning, & sugar if you make sweet pickles (not pictured).

This is the seasoning we used.


Mrs. Wages was recommended to us by Gentry's aunts. I found it in the small canning section in the baking aisle at our Kroger.

How to can pickles:

First, I got all the cucumbers together.


Then I sorted them by size. I put the thinner ones in one pile, and the thicker ones in another. I used the thin ones for the chips, & the thick ones for the spears.

Then I began cutting up the chips.


I put the chips for the bread & butter pickles into jars.


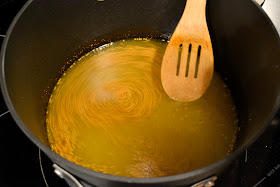
Then we mixed up the seasoning packet according to its directions. This is where the sugar came in. We used the packet, sugar and vinegar for this part. Do not use an aluminum pot. Apparently there can be a chemical reaction... according to Mrs. Wages, who knows her stuff I'm assuming.


Mix it all up until it comes to a boil. Then I ladled the mix out into my glass measuring cup to make pouring easier, & poured it into the jars.


This mix is very sticky. The seasoning packet said to wipe down the tops of the jars with a damp warm rag. Then get someone with strong hands to screw the lids on - Thanks G!


& into the pressure canner they go! Our canner said to fill the pot with 3 pints of water & 2 Tbsp of the distilled white vinegar (this keeps the jars from having spots on them).


Close the lid, making sure the arrows are lined up & it is sealed tight. Then turn the eye on high heat. Now wait for a steady stream of steam to come out of the vent pipe on top, & for the air vent/cover lock to pop up saying there is pressure inside. Once that happens, set the timer for 10 minutes. Then put the three-piece pressure regulator on top of the vent pipe & wait for it to consistently start rocking. Once that happens, set your timer for 5 minutes if you are cooking quarts, & 10 minutes if you are cooking pints. (All of these instructions were from the manual to our Presto Pressure Canner manual)

While the bread & butter pickles were cooking, I put together the dill pickles. For a couple of them, I added some minced garlic for my father-in-law who loves garlic pickles.


I also began mixing the dill pickle seasoning mix on the stove top while waiting for the bread & butter ones to cook. I poured that mix into the dill pickle jars & did the same process as I did with the others. 

Once the 5 or 10 minutes is up for the pressure canner, turn the heat off & remove the pressure canner from the stove top & put it onto hot pads. Wait for it to start cooling down & for the air vent/cover lock to pop down, which means the pressure is done. Only then do you take the three-piece pressure regulator off the top. Then we waited for the tops to start popping inside. This means they are sealed. The pressure canner cooks them at a very high heat with intense pressure, making them sterile. Once that heats cools down & the pressure is gone, it creates a vacuum. This enables the cans to have a long shelf life.

Here are our bread & butter pickles:


I had no idea how any of this stuff worked a week ago. We visited Gentry's family in Ohio last weekend & I talked to his aunts about canning. I had no clue how it was done, but I knew it would probably be good to learn since we were going to have a ton of vegetables from our garden coming in soon. I'm actually really excited about canning more things. It was fun & pretty easy!

I plan on blogging instructions for canning other veggies. We have quite the variety growing strong in our back yard: corn, tomatoes, okra, banana peppers, bell peppers, potatoes, carrots, black-eyed peas, cucumbers, squash, zucchini, eggplant & butternut squash.

We plan on planting broccoli once it cools a bit outside. 

I hope these instructions were easy enough!

  
{alli}

7.11.2012

happy 1 year, kitchen!

It has officially been one year since we moved in to our home. In order to recap all that has changed with each room, I plan on posting the full renovation processes we have taken on so far. 

To kick it off, we will start with our kitchen.

When we first saw the house, the majority of the kitchen/hearth room area was brown. 

 
I could kick myself for not taking more photos of the kitchen before we began renovating.

We first saw the house in December of 2010 when we were in Louisville visiting Gentry's parents over Christmas break. I have always loved interior decorating, but I had never taken on a huge project before. The first time we walked through the house I began having tons of ideas in my head of the different things we could do. It was a bit difficult to see past all of the brown, but pretty soon we had a color pallet picked out, & a new floor plan in place.

This is the inspiration we used for our kitchen redo:

We did not end up painting the upper cabinets white, but we did follow it pretty closely with other things.

This is not high-tech whatsoever, but here is an idea of the original floor plan:


We chose paint colors while Gentry was working at Lowe's in Jackson, TN. 

For the kitchen cabinets we went with Eddie Bauer's Fig color (EB47-3)


 We painted over the paneled walls with Valspar's Homestead Resort Parlor Taupe (7003-1)


We used Valspar's white high gloss for the inside of the cabinets & all of the trim & crown molding.

We also purchased the refrigerator & oven there after they had a water leak that got the boxes wet, but nothing was damaged. We paid less than the original refrigerator price for both appliances.

 The next phase was the gutting phase. We began this process in late June 2011. The house was miserably hot, & the fumes were pretty strong from time to time.

We started by taking down the overhead cabinets above the bar area.


Then we took out the soffit & patched up the ceiling.


Then we took out the fluorescent light & the small fan & installed three can lights. We also took all the other cabinets out along with the drawers and lower cabinet doors.


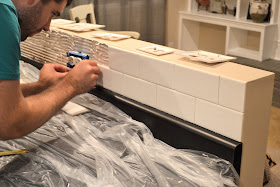
Then the half wall went up to separate the kitchen & hearth room.


The next step was to install the electrical in the walls before putting the cabinets back in. We also created a space for a new dish washer since the original kitchen did not have one.


I painted all of our cabinets outside. We decided to go ahead & give the insides a fresh coat of glossy white, which ended up making them feel new.


Here is a look at the new floor plan:


We put the cabinets in, then installed the appliances.


We ordered our black counter tops from the company that supplies them for Lowe's & ended up saving a ton of money by picking them up there & installing them ourselves.

Eventually we installed the white subway tile back splash.


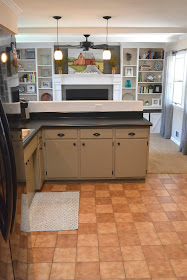
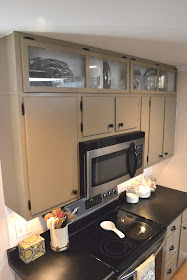
& with the other things we have done since then, it brings us to our kitchen today:


& there you have it. We love our kitchen! We are basically done with this room of the house, & have really enjoyed how it turned out.


{alli}